Note: This post contains affiliate links. As a Skillshare Affiliate and Amazon Associate I get commissions for purchases/signups made through links in this post.
I’ve consumed lots of videos and articles with easy art tips, so you don’t have to!
Furthermore, I’ve added quite a few of my own tips and tricks too and compiled the ultimate list of drawing tips you can use immediately.
Enjoy!
Table of Contents
Art Basics Tips
1. Everything Is Shapes And Edges
If you break it down, everything you could draw or paint is just shapes that are connected either with hard or soft edges.
This is extremely useful knowledge because it enables you to draw and paint everything you want.
If you learn to see everything for what it is, if you learn to see shapes and edges instead of objects, you will truly be able to draw anything!
This video demonstrates it very well:
2. Understand The Color Wheel
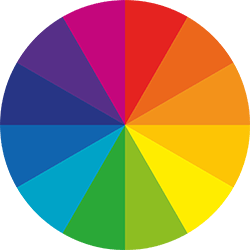
Color is a very complicated topic. Every artist has to confront it sooner or later.
For starters, it helps to get a basic understanding of how the color wheel works:
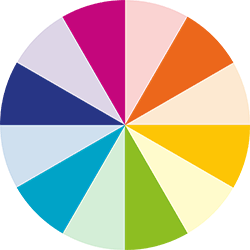
The basic hues are red, blue and yellow:
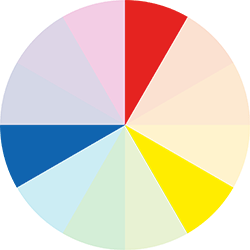
If you mix those, you get the secondary colors orange, green and purple:
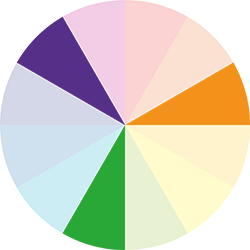
If you mix a primary with a secondary color you get some in-between tones:
In general, the color wheel is divided into warm (red, orange, yellow) and cool (blue, purple, green) hues:
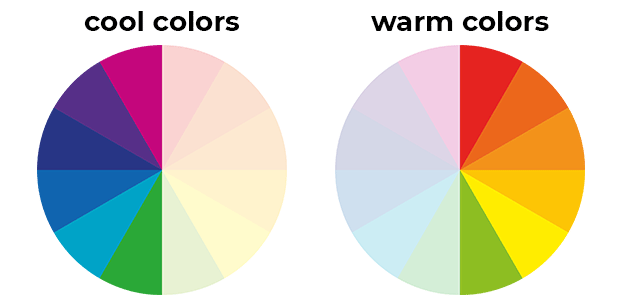
Cool colors convey a cold, sad or lonely atmosphere, while warm colors convey happiness, fun and positive feelings.
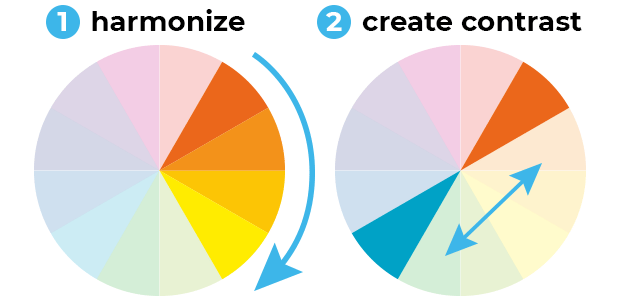
Colors that lie close to each other tend to harmonize (1) and colors that are opposite each other tend to create a strong contrast (2):
If you want to learn more about color, check out Draw Paint Academy’s Comprehensive Guide To Color Theory For Artists.
3. Foreshortening Made Easy
Foreshortening can seem like a complex thing and impossible to learn at first.
While learning one-point and two-point perspective drawing is great, it still doesn’t help you out that much with foreshortening parts of the human body, for example.
A good trick to make foreshortening easier is this:
Draw certain landmarks and just connect them with lines.
Like this:
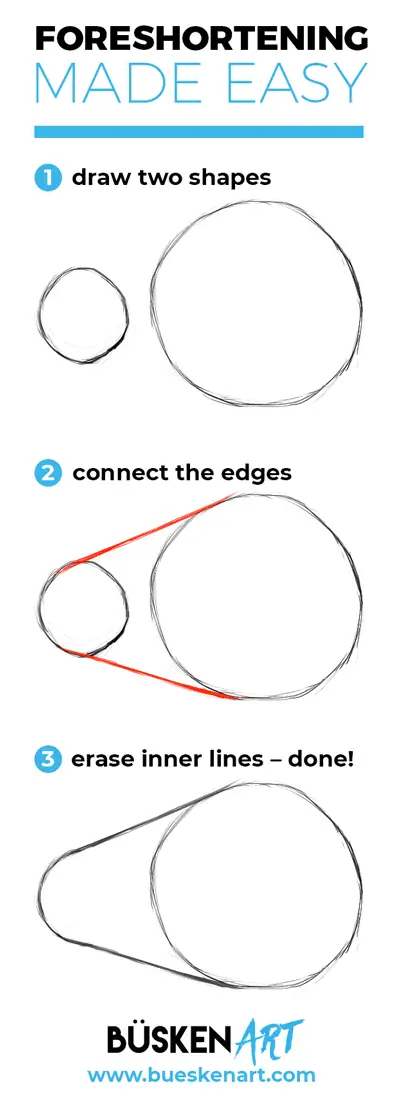
Thinking about it this way can help you to get a better understanding of it.
You can go further and do it with more complex forms. Funnily, it’s called the “Rayman Technique” (remember that game of the 90s?):
Drawing Practice Tips
4. Draw Or Paint Daily
To maximize your progress as an artist, you have to practice your craft as often as you can.
It’s important to establish the habit to work towards your goal of becoming better daily.
After all, it can be much more efficient, if you draw something every day instead of drawing for 5 hours once a week…
5. Do Dedicated Practice Sessions
To become a better artist you have to practice.
Working on big projects poses its own challenges and overcoming those makes you better as a result.
But it’s important that you allot some time for dedicated practice sessions.
Time where you deliberately practice drawing things like faces or bodies in different poses for example.
To learn the best way to practice drawing check out my article on how to get good at drawing fast.
6. Build A Visual Library
Every time you draw something new, it’s harder than drawing something you’ve already learned how to draw.
People who “can draw” have usually built a huge visual library of things they’ve already drawn multiple times.
Everything you draw, every face, dog, car or whatever it is, gets stored in your visual memory.
Once you’ve learned to draw it, your brain retrieves this information which makes it easy to draw it.
So, build a huge visual library of things you’re able to draw – in different perspectives and conditions.
7. Allow Yourself To Be Messy
Drawing and painting perfectly detailed and fully rendered artworks is one thing.
But it takes time and can often kill any effect a painting would otherwise have.
Doodle around from time to time! Sketch! Don’t draw all the details!
In other words: Allow yourself to be messy!
And don’t worry, if your sketches look better than your finished art. It’s a common phenomenon. Read the linked article to find out why.
Art Mindset Tips
8. Work On Your Mindset

Success starts with the right mindset and attitude.
Becoming a better artist is a challenge like any other in life. You have to be willing to do the required work and start believing that you can achieve anything you want.
If you constantly think negative thoughts and look for excuses, you won’t achieve anything.
For example, some people think drawing is for kids and just don’t start practicing because of it – even if they actually want to. Drawing is not childish though, it’s just an excuse.
Start improving your mindset by reading my article 10 False Beliefs About Art – The Mindset Of A Successful Artist.
9. Just Start!

This may be the most important art tip you’ll ever read:
Just start already!
Thinking too much can lead to procrastination and paralysis by analysis.
So, do me a favor and share this article on social media. But then do yourself a favor and draw something.
10. Think Before You Paint

Another easy but effective art tip is this:
Instead of rolling up your sleeves and just going after it, it can often help to think before you paint.
Where is the light coming from? Does this plane have a hard or a soft edge? How does perspective affect the object I’m drawing? …
Asking yourself questions like this before you make a stroke can make a fundamental difference in the quality of your outcome.
Art Hacks
11. Flip Your Drawings
Flipping your drawings horizontally can reveal mistakes and inconsistencies that you might not notice otherwise.
It helps you fix your mistakes and get better at drawing more quickly.
Try mirroring your artwork several times while creating it, even in the sketching phase. It might save you a lot of frustration later on and you will learn a lot by doing this.
12. Squint Your Eyes

This is a really helpful trick when drawing or painting any image:
Try squinting your eyes regularly while you are creating a piece of art.
It tunes out all the details and helps you see the basic shapes, values and colors more easily.
While spending hours and hours on a painting, it can be easy to get lost in the details and spend too much time on the finishing touches.
Squinting your eyes helps you see if the painting works as a whole – when looking at your drawing, but also when looking at a reference image.
13. Draw Hair With A Toothpick
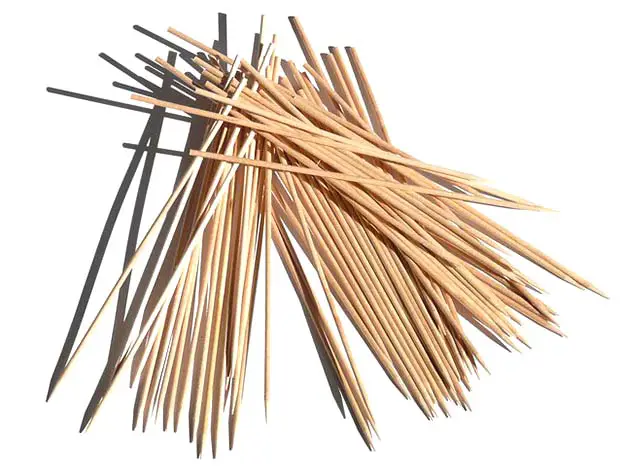
Drawing hair with pencils can be tricky.
You can draw each individual strand of hair, but in the end it often looks stringy and fake.
Even if you pair all those fine lines with broader strokes with the side of the pencil, it won’t always be the solution.
It disregards the fact that some hairs are bright because they’re lit – let alone that hair can be blonde too.
A useful trick is to draw hair as you usually would and „draw“ bright strands of hair with a toothpick – scratching away the pencil marks.
RELATED: Why Can’t I Draw Anymore?
14. Paint Water Easily
Painting water is a hard task and how you should do it depends on a lot of factors:
How clean is the water? At what angle are you looking at it? Is it windy or is it raining? Are there waves or is it calm? etc.
One easy way to paint water is to look at what you can see in many photographs:
Water often directly reflects what’s above it.
Look at this photo for example:

Basically, it’s a top-down reflection of what’s above the water: The grass, the trees and the sky/clouds. It’s just a little distorted.

In this second photo the reflection isn’t as apparent. But you can still see how the brightness and colors of the water come from the reflected objects.
Face Drawing Tips
15. Basic Facial Proportions
Drawing faces can be overwhelming at first, but knowing the basic facial proportions can help a lot.
I recommend starting with a front view of the face (no perspective) to make things easy.
To make quick progress learn these basic proportions that apply to almost every face:
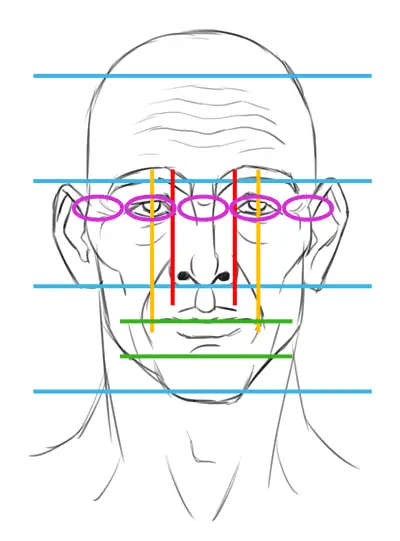
• the face can be divided into three parts of equal size:
forehead (hairline to brow line)
nose (brow line to bottom of nose)
mouth and chin (bottom of nose to bottom of chin)
• the face is about 5 eyes wide
• the sides of the mouth line up with the center of the pupils
• the nose fits between the eyes (width)
• the height of the ears and nose are the same
• the lip line is about one third of the way between the bottom of the nose and the bottom of the chin
These rules obviously don’t apply 100% to every face on earth. But they are very good rules of thumb to help you draw more accurate faces.
16. Shadow Patterns in The Face
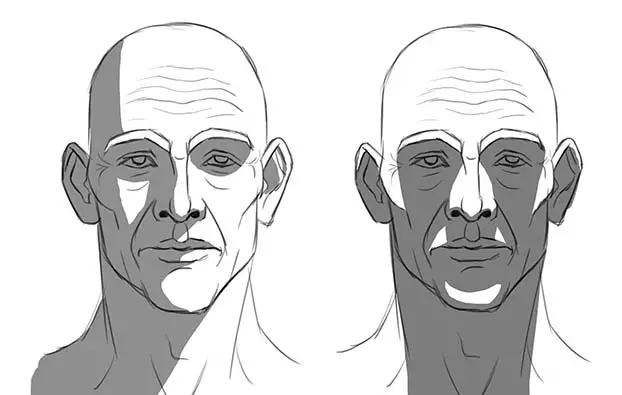
Knowing the basic shadow patterns that appear on the face can help you a lot in learning how to shade faces.
Check out my video that explains them all in detail:
Also, check out this amazing free tool to learn how to shade a head:
If you like these: watch my whole playlist of shading videos.
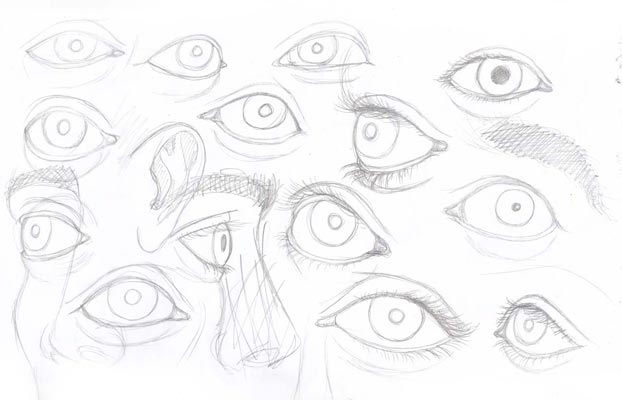
17. Don’t Draw Eyes White (Only The Reflection)
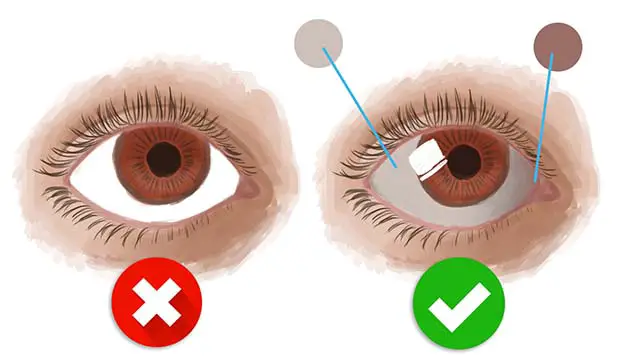
A common beginner mistake is to draw eyes white.
In most scenarios, this doesn’t lead to the desired realistic drawing result.
Your eye drawings or paintings can make leaps and bounds if you use the following drawing trick:
Shade the eyes like a ball with a light grey tone and leave only a small rectangle or circle completely white (the reflection).
The eyes won’t look too dark if you draw the surrounding values right. And the reflection will make them look really shiny/wet because they’re the brightest element in the composition.
» Drawing Expressive Eyes for Beginners
18. Make The Upper Lip Darker Than the Lower Lip
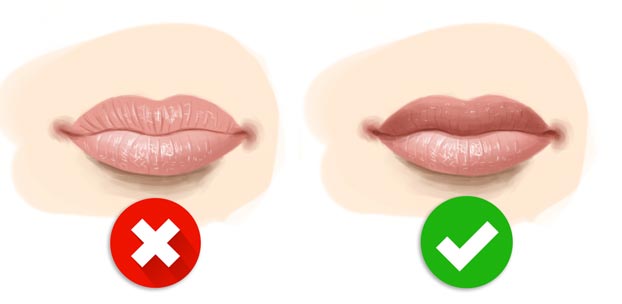
In the most usual lighting situations, a person is lit from above or at a slight angle from above.
That leads to the upper lip being darker than the lower lip.
The upper lip turns away from the light while the lower lip receives more of it.
Moreover, the upper lip often casts a shadow on the lower lip, so you have to consider that too.
Value Drawing Tips
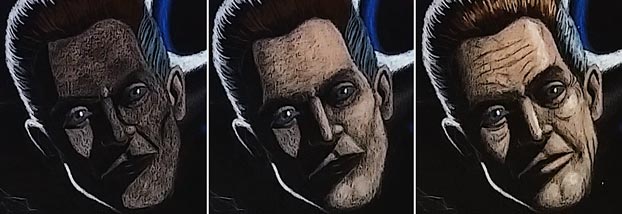
19. Use A Full Range Of Value

The human eye craves contrast. It’s a basic element of design and it applies to drawing and painting, too.
Therefore, it’s a good idea to use a full range of values (brightness).
Just compare these two images.
The left one looks washed out while the right one jumps off the page/screen and looks appealing.
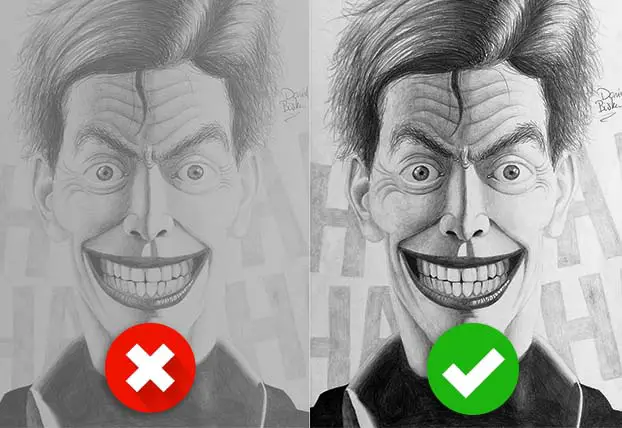
Click here, If you want to learn more about values.
20. Paint The Darkest (Or Brightest) Parts First
Try to draw the darkest parts first when you’re starting to create an artwork.
This way you establish a value range and know the darkest and the brightest parts from the get-go.
Everything else falls in between.
When drawing on a dark surface it’s the other way round:
Draw the brightest parts first!
Improve Faster With My FREE e-Book!
Learn how to MASTER drawing in 5 easy steps with my FREE PDF guide!
Discover a methodical way to learn drawing effectively!
21. Use High Contrast For Metal
Drawing metal can be challenging. After all, there are a lot of different kinds of metal with different amounts of reflection.
One key point is using high contrast.
Metal reflects its surroundings – sometimes directly. That leads to high contrasts in values.
Very bright tones (e.g. the reflection of a light source or the sky) can sit right next to very dark tones.
The edges of those values can differ from very harsh to very soft, depending on the degree of reflection the metal has.
Considering this can get you that much closer to painting realistic metal.
22. Consider A Backlight in Your Artworks
Using two light sources is a great strategy to create atmosphere in an artwork. It’s often done in film and portrait photography – and in painting as well.
A simple way to do this is to add a backlight.
Add a light source that is behind the subject and you can almost trace the contour of it with the color of the light. It’s also called rim light.
It’s an easy way to boost the depth and mood of a painting.
Just check out how much less atmospheric my drawing from above is without the backlight of the moon:
Try out this easy art tip to make your artworks look much more atmospheric.
RELATED: How To Draw On Black Paper: A Complete Guide
Composition Art Tips
23. Plan Ahead
If you want to draw a finished piece of art, it can be really helpful to plan ahead.
Not all drawings and paintings are created equally:
Sometimes you just want to let your creativity loose and see where you end up. Some of the best artworks have been created that way.
But if you have a really big project in front of you, it may be much better to plan ahead.
You can do this by:
- thinking about the size and orientation
- doing composition sketches
- doing value studies
- doing color thumbnails
If you have a great idea for a painting in mind, but want to do it right, check out this in-depth guide on planning a painting.
24. Create A Focal Point
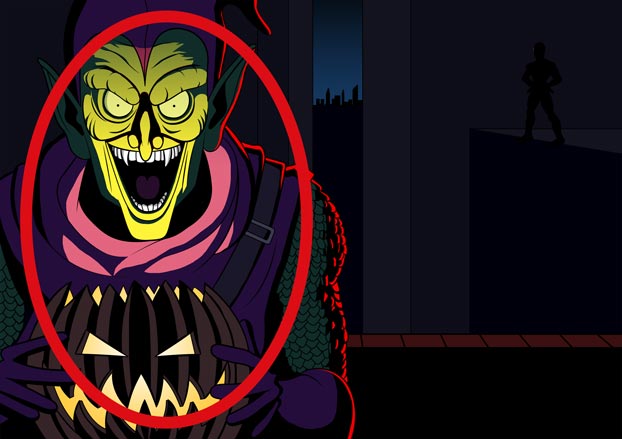
If there are too many competing elements in an artwork, the viewer doesn’t really know what to look at first.
This can create a frustrating viewing experience.
The best drawings and paintings have a clear focal point.
You can create a focal point with:
- values/contrast
- saturation
- details
- line thickness
- sharpness
Watch the following video or check out the graphic below:
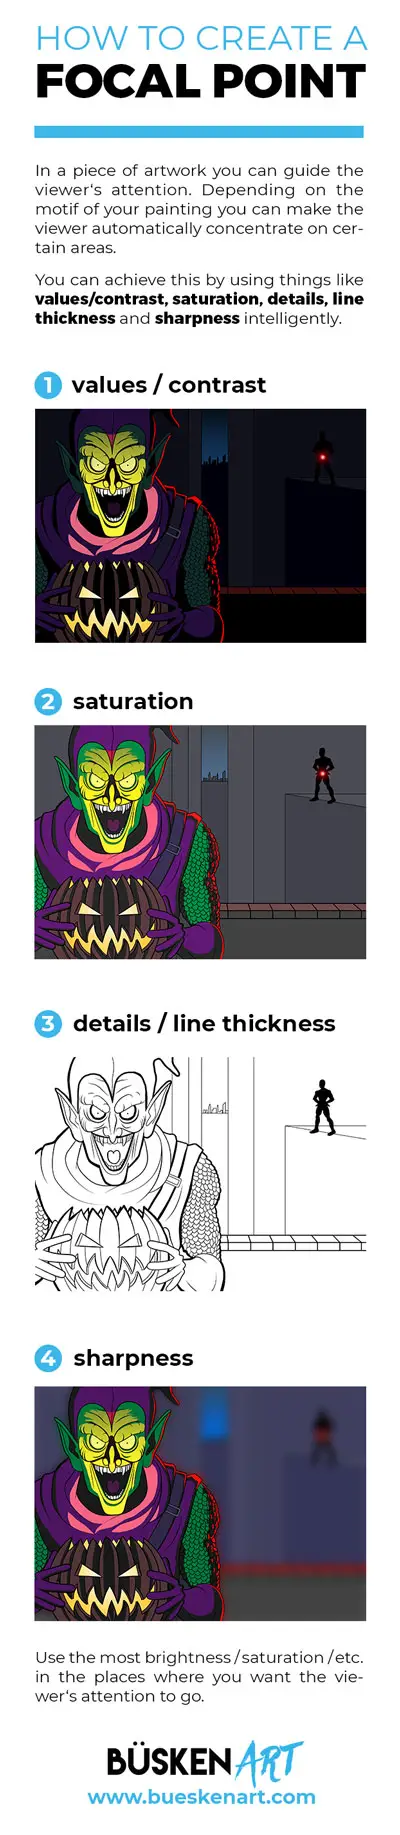
In essence, don’t make everything saturated/detailed/sharp, but just the important areas of a painting where you want the viewer’s attention to go.
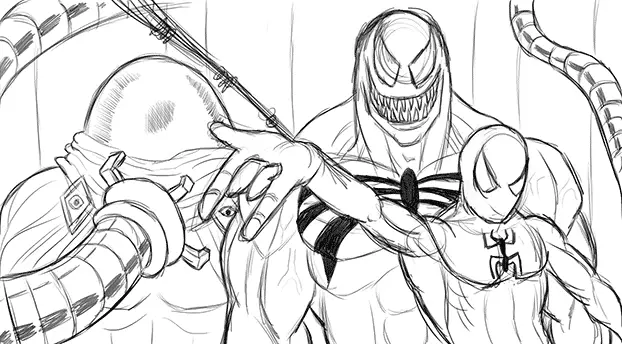
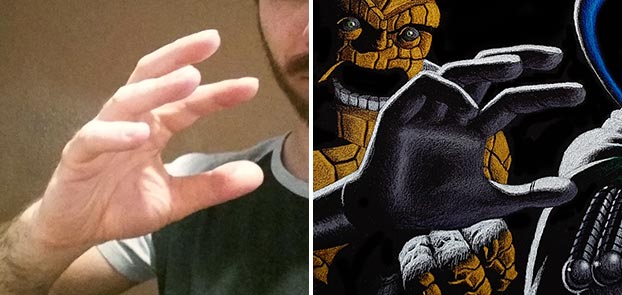
25. Use The “Rule Of Thirds”
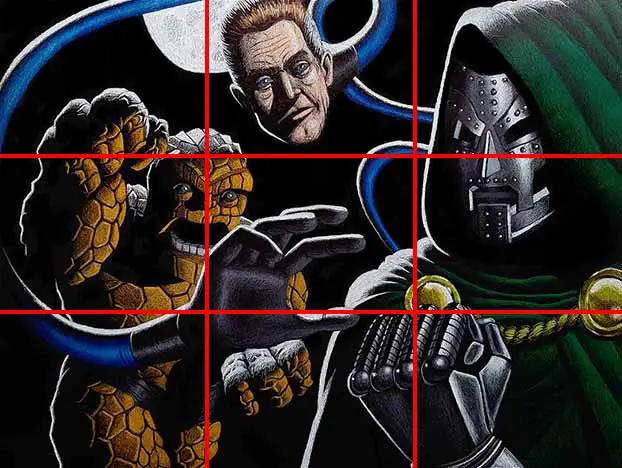
The “Rule of Thirds” is one of the most basic composition methods and it’s very effective.
Essentially, you divide your artwork into nine equally large parts and put the most important elements of your drawing on the intersection points of the lines.
Using this can immediately make your artworks more interesting – more interesting than putting the elements of your composition in random places.
In this drawing of Dr. Doom / The Fantastic Four several important elements of the drawing are put on the intersection points of the lines:
Dr. Doom’s and Mr. Fantastic’s hands and The Thing’s face.
Check out this helpful guide on how to use the rule of thirds.
Art Process Tips
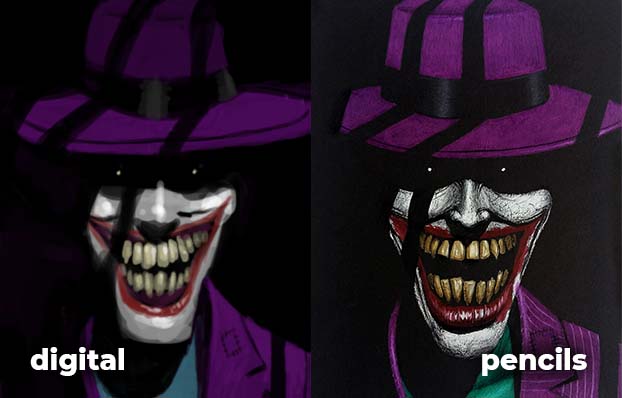
26. Use Digital Art For Test Runs
Do you know the feeling?
You’re in the midst of a big painting project and everything is going fine.
But then there’s this one area of the painting that you kind of procrastinate to work on. Until the time comes where it’s the last thing you have to do and you’re getting really nervous about it.
What I often do in a case like this is to take a photo of my artwork and work on it digitally with my drawing tablet.
It serves as a kind of test run for the final artwork and can boost your confidence a lot.
If you’re able to make it look beautiful on the computer – why shouldn’t you be able to do the same on canvas or paper?
By the way: If you’re interested, you can check out my graphic tablet and all the other art tools I use here.
CHECK OUT: How To Improve Your Digital Art Quickly
27. Take Your Time
Creating art is a marathon – not a sprint!
No one can deny that unfinished work and loose pieces of art have their place and their unique appeal.
But drawing and painting detailed finished artworks takes a lot of time and there’s no need to rush.
Take all the time you need!
28. Start Light And Build From There
Another easy drawing tip:
Don’t try to draw or paint everything perfectly from the start.
When sketching, start with loose lines and gradually build towards clearer and more precise strokes.
When painting, use a big brush at first and get the basic shapes down, before starting to draw too many details.
This allows you to make mistakes in the early stage of an artwork and it reduces the pressure on yourself a bit.
29. Draw Details Wisely
Details can be a great way to enhance a drawing by pleasing the human eye.
You have to use details wisely though.
Drawing too many details can lead to visual overstimulation and make an artwork unpleasing to look at.
What you can do to avoid that problem is this:
Draw most of the details in the most relevant parts of a drawing or painting. The elements that you want the viewer to focus on.
By doing this you can actually control the behavior of the viewer because the human eye is naturally drawn to the most detailed parts of an artwork.
30. Use Reference Images
I understand the desire to draw from your imagination. I have it too.
But you won’t get there if all you do is drawing from imagination.
First, you have to refine the basic idea of the things you want to draw in your head.
To draw something from your imagination convincingly, you have to draw it from reference several times beforehand.
Drawing from reference images is what enables you to draw from imagination in the long run.
RELATED: 15 Drawing And Painting Ideas To Spark Your Creativity
Now it’s Your Turn!
Which art tips did you like best?
Did I miss anything? Do you have a good art tip of your own? Shoot me a comment below. If I like it, I might add it to the article.
Thanks for reading!
P.S.: Just to let you know: I’m on YouTube, Instagram and Facebook. I’d appreciate it if you check it out!
READ NEXT:
How To Get Great At Drawing Fast: The Best Way To Practice
»Just start!« 😀 So true. I like the idea of using self-made reference pictures as well. And the point about »DO DEDICATED PRACTICE SESSIONS« is something, I hear/read quite often. Do you have a fixed schedule for such practice sessions for yourself? How do you do it?
Hey David!
Let’s be honest here: I do way too little dedicated practice. 😀 I kinda lean towards the side of “finishing projects” that I describe in my article on the best way to improve your art. You can learn a lot that way, too.
I know that dedicated practice can lead to quick improvement, but it’s often boring and tedious. I SHOULD do more of it. And at a certain point I definitely will…
As you know, Blogging and making YouTube videos takes up a lot of time as well. I still struggle to find the right balance between drawing/painting, writing and creating videos. After all, I’m only human, too. 🙂
In the end, it’s all a matter of priorities and I think you should do what you feel like doing in that very moment. If you really want to get better though, you need to make a commitment and also learn to love the process of practicing…
Thanks for all of your great tips, i think your tio about doing art frequently is probably the best, a lotta times ill want to draw and i will keep putting it off , but it really relaxes you and can put you in auch better frame mind!
Yeah, that’s so simple, but important.
Even after drawing for 30 years I can still relate. I often put it off. Not because it’s no fun in general…
What helps me personally, is to start big projects that take multiple hours. This way I always have the urge to finish what I started. 🙂
Love your articles. Am procastrinating to start!
Should keep a sketch pad handy and START.
AGAIN you are a great teacher and motivator –
Need more time. Guess should book in a face to face class. thank you for your inspirations.
Anne-Marie.n
Thank you very much, Anne-Marie!
But you’re right: You should just START! Booking a face-to-face class is just another form of procrastination. Except, if it’s someone yelling at you to START! 😉
Have a great day (…and START)!