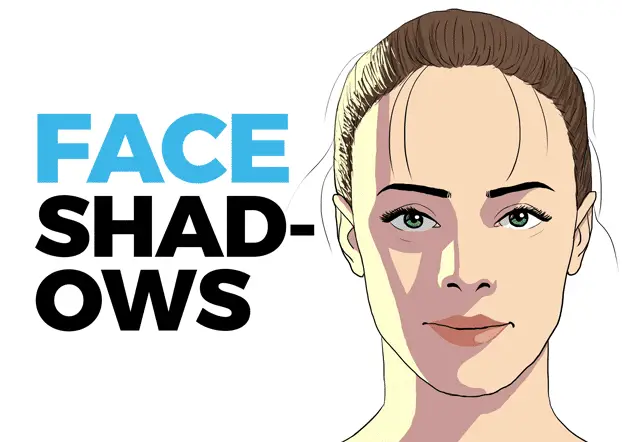
If you want to draw or paint a realistic portrait, you need to master light and shadow.
But where are the shadows on a face? Where exactly do you put them to make it look correct?
It’s easier than you might think at first.
My article explains the recurring shadow patterns on a face … and how to draw shadows easily.
Let’s roll!
Table of Contents
1. Where Are The Shadows On A Face?
The shadows on a face are in the areas where the light doesn’t hit. These are usually one side of the face, one side of the nose, below the nose, below the lips, and below the eye sockets. The direction of the light source has a profound impact on the placement of the shadows though.
If that sounds like a lot to swallow, don’t fret: I’ll explain in detail below.
Note: The examples in this article are all in cel shading style. Click the link to learn more about that!
2. How To Shade A Face – The Basics
2.1 Use Simple Forms
To understand how to shade a face correctly, you need to know the basics of light and shadow.
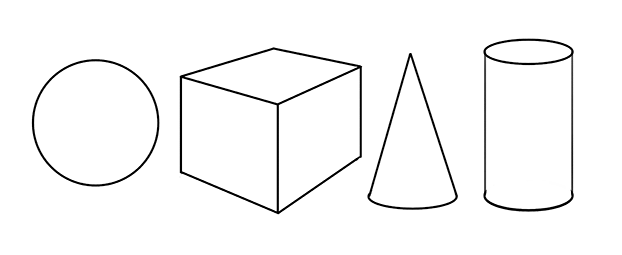
In essence, it’s as easy as deconstructing the head by using simple geometric forms.
Drawing simple forms isn’t complicated. And it’s easy to learn how to shade spheres, boxes, cones and cylinders.
Don’t think you’re up to it? Here’s why anyone can learn to draw!
If you can do that, you can also shade a simplified head that’s composed of these simple forms.
So take these …
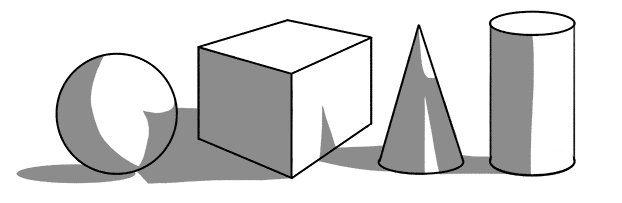
… and build a simplified head out of them:
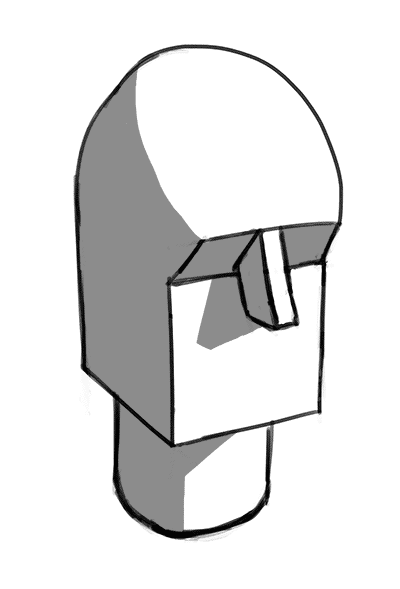
You can take it a step further and add more planes and details to make it look even more like a head:
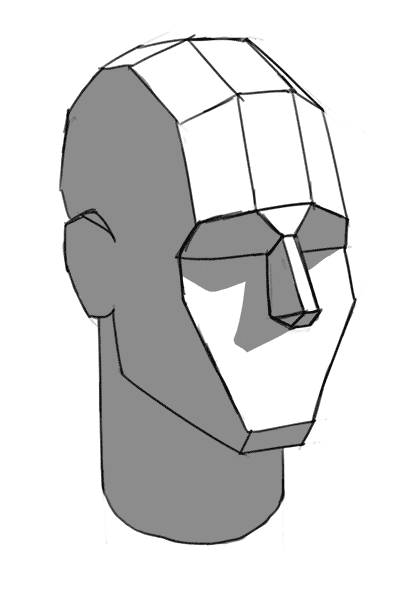
There’s a model just like this, but much more detailed. It’s called the Asaro Head.
Click that link to find out all about it in my ultimate guide!
2.2 Understand Form Shadows & Cast Shadows
Once you have this simplified version of a head, you need to know the difference between form shadows and cast shadows.
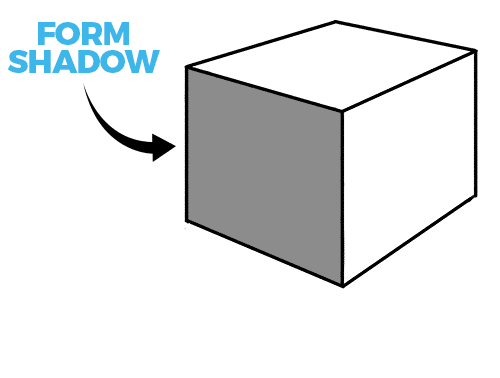
2.2.1 Form Shadows
Form Shadows are the type of shadow that appears when a plane is turned away from the light.
In the case of a box, the side(s) that are turned away from the direct light are in shadow:
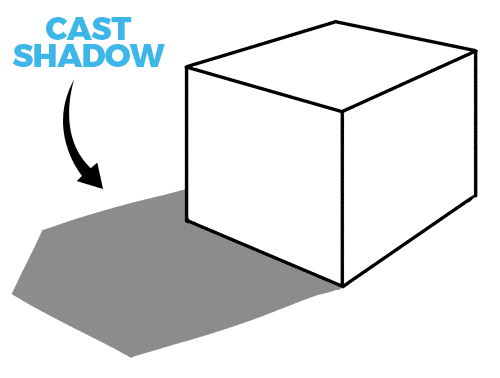
2.2.2 Cast Shadows
Cast Shadows are the type of shadow that appears when a plane would receive direct light, but another object is blocking the light. The shadow that this object throws is called a cast shadow:
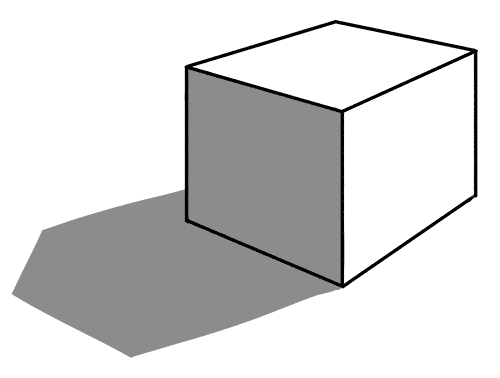
Together, form and cast shadows create a believable lighting situation:
If you want to learn more about the basics of light and shadow, check out Proko’s guide.
Need some general help before learning how to draw faces?
Check out my article on why you can’t draw anymore and my guide on how to learn drawing fast!
3. Know The Basic Lighting Patterns

Form shadows and cast shadows flow into each other seamlessly.
This creates repeating shadow patterns that are largely similar under normal lighting conditions.
Knowing these patterns can make drawing shadows on a face that much easier.
For a basic introduction, I recommend this video series of mine:
Let’s take a look at these facial shadow patterns in more detail.
CHECK OUT: Must-have Art Equipment I Recommend
3.1 Lighting From The Top (Butterfly Lighting)
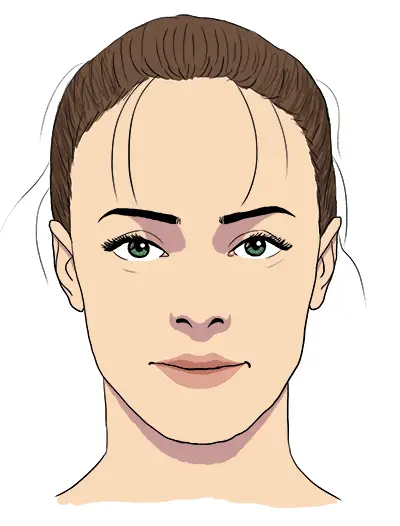
Butterfly Lighting is when the light shines from above the face.
It’s called like that because the shadow below the nose somewhat resembles a butterfly.
With Butterfly Lighting the shadows are:
• beneath the eye sockets
• below the nose
• below the lips
• on the lower lip
• below the chin
The more the light moves above the head, the longer the shadows become:
When shading with two values, it can even look good to draw shadows on the sides of the face.

3.2 Lighting From The Top – Angled
There are two common lighting situations when the light hits from the top at an angle.
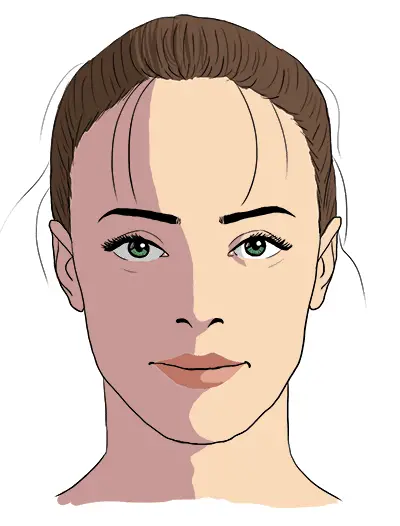
3.2.1 Loop Lighting

Loop Lighting is when the light shines from above at about a 45° angle.
This creates a shadow that “loops” around the nose.
With Loop Lighting the shadows are:
• on one side of the face
• beneath the eye sockets
• below and beside the nose
• below and beside the lips
• on the lower lip
• below and beside the chin
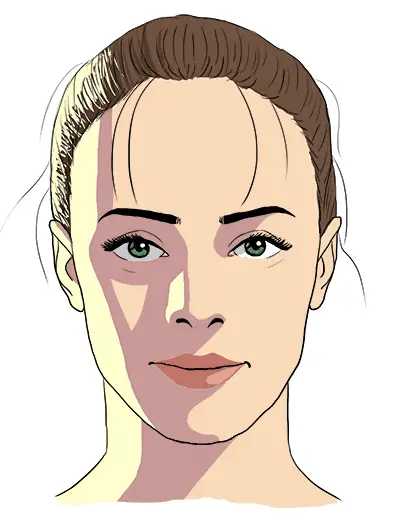
3.2.2 Rembrandt Lighting
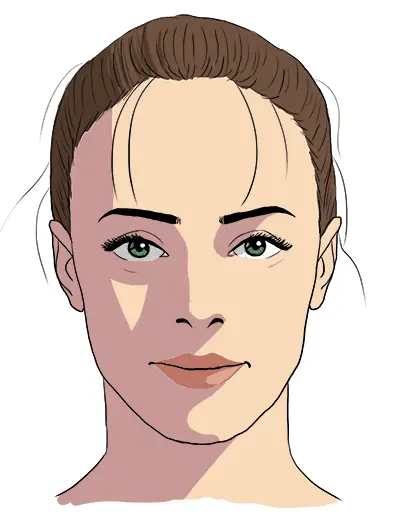
Rembrandt Lighting is when the shadows of the eye sockets, the nose, and the side of the face create a triangular pattern. This is called the Rembrandt triangle.
The name derives from the famous dutch painter Rembrandt who used this lighting in many of his portraits.
With Rembrandt Lighting the shadows are:
• on one side of the face
• beneath the eye sockets
• below and beside the nose
• below and beside the lips
• on the lower lip
• below and beside the chin
• triangle of light on the face
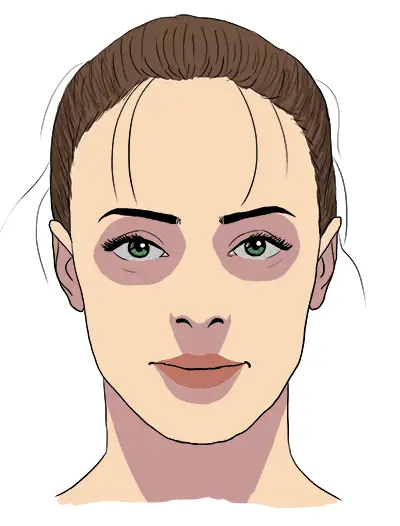
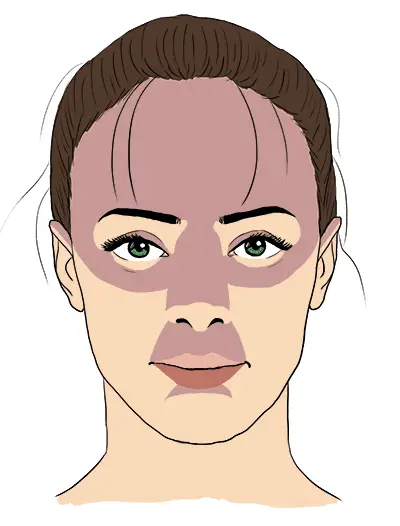
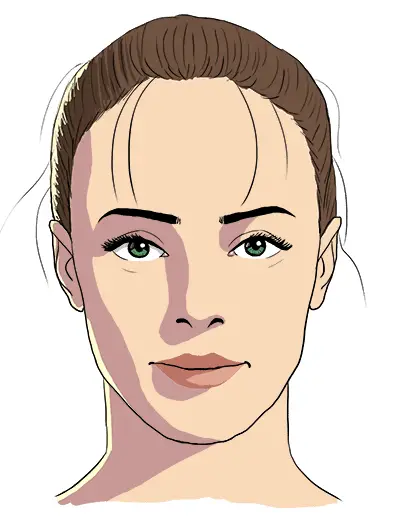
3.3 Lighting From The Side (Split Lighting)
Split Lighting is when the light comes straight from the side.
Because light and shadow are pretty much evenly split among the face, it’s called like that.
With Split Lighting usually one side of the face is covered in shadow.
There’s no Rembrandt triangle or anything like that. The cast shadows of the nose and lips cover the whole side of the face.
3.4 Lighting From Below (Under Lighting)
Now, this one looks a little different at first, doesn’t it?
Under Lighting is when the light is coming from below the subject’s face.
Since it’s the opposite of lighting from the top, the bright and dark parts are somewhat opposite as well.
With Under Lighting the shadows are:
• on the forehead
• on the upper cheeks and upper eyelids
• above the lips
• on the lower lip
• on the upper part of the chin
• the nose casts a big shadow upwards
Note: Since this lighting situation is so unusual, it’s often used in art, photography and movies to make someone look evil or scary. Just the sheer fact that it’s so uncommon, gives it kind of an eerie look.
3.5 Lighting From The Front (Front Lighting)
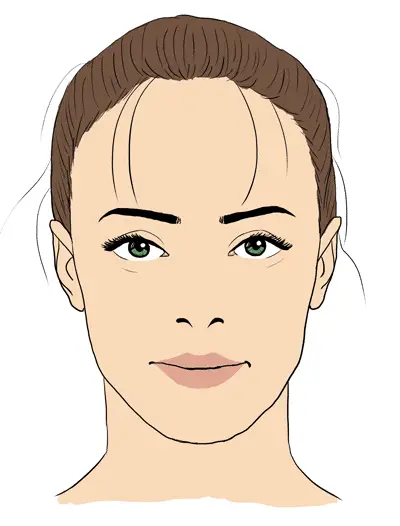
Where are the shadows? Am I kidding you?
With Front Lighting the light is coming directly from the front. You see almost no shadows.
Everything is illuminated and the shadows are behind the head where you can’t see them.
3.6 Lighting From Behind (Rim Lighting)
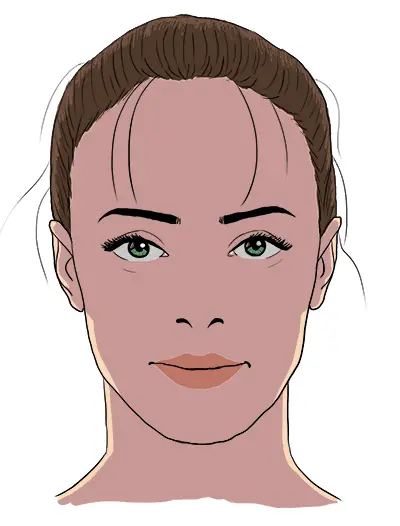
Just like lighting from the front, lighting from behind is also rather easy to paint.
With Rim Lighting the whole face is covered in shadow and you only see light at the rim of the head.
To understand how atmospheric Rim Lighting can be, check out this example.
4. Using Two Light Sources
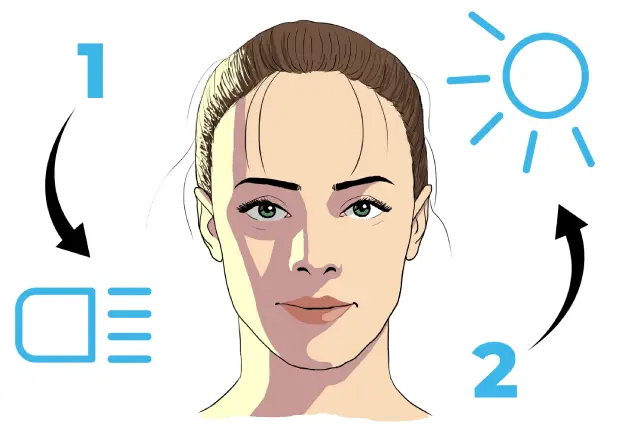
Once you have figured out these basic patterns of shadows on a face, the next step is to learn how to shade with two light sources.
Usually, artists use a combination of the previous lighting situations.
For maximum effect, the second light source mostly comes from the opposite direction of the first one.
When you combine light sources this way, the second light source generally brightens part of the shadow areas created by the first light.
Here are some examples:
4.1 Loop Lighting + Rim Lighting
When combining Loop Lighting and Rim Lighting, the second light source illuminates the rim of the shadows of the first light source.
4.2 Rembrandt Lighting + Side Lighting
When Rembrandt Lighting is combined with Side Lighting it looks a little bit different.
With Rembrandt Lighting, more of the face is in shadow. Therefore, it lends itself well to use a second light source that illuminates larger parts of the shadows.
Improve Faster With My FREE e-Book!
Learn how to MASTER drawing in 5 easy steps with my FREE PDF guide!
Discover a methodical way to learn drawing effectively!
5. Individual Differences When Shading A Face
Like I already mentioned, these are just the basic shadow patterns.
While they are very useful to know as a base, there is more to learn to take your face drawings to the next level.
After all, every face is different. Little details can change how the shadows fall on a face.
You need to study from life or from photos to get the hang of this.
To get you started, here are some things to watch out for:
5.1 Wrinkles On A Face
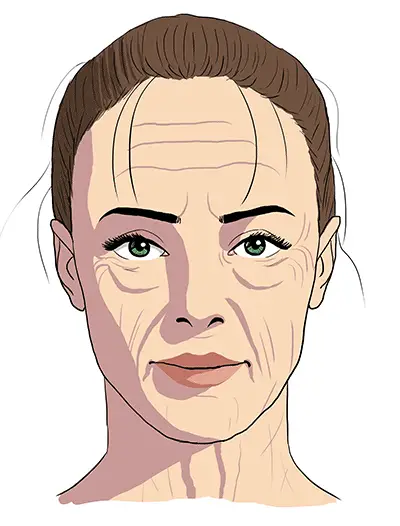
Wrinkles can have a huge impact on the shadows on a face.
Obviously, the older you are, the more wrinkles you have on your face. And these tend to throw little shadows, depending on how deep they are.
The most common ones are the wrinkles beside the nose. These tend to appear first when getting older. And they often are visible on young people, too. Especially when they smile.
Check out my guide on how to draw old faces with wrinkles.
5.2 Individual Anatomy
Age is not the only factor that has a huge impact on the shadows on a face. People have different anatomy, too.
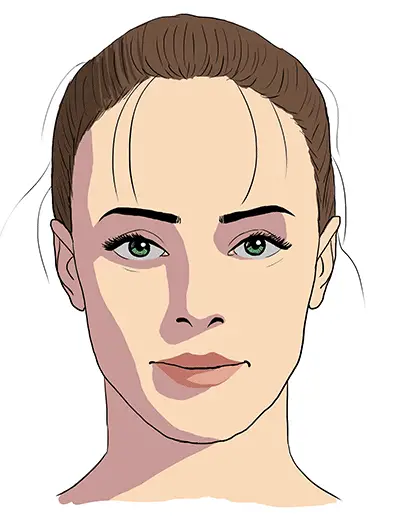
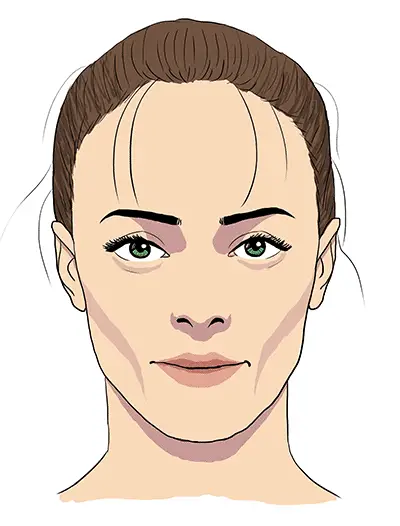
When shading a face, I think it becomes especially visible when looking at the eye sockets.
People with very pronounced eye sockets often have their whole eyes covered in shadow when the light is shining from above:
In contrast, some people have less pronounced eye sockets and the eyelids can still catch some of the light:

5.3 Degree Of Body Fat
Furthermore, the degree of body fat also plays a role.
People with high amounts of body fat tend to have smoother shadows – but apart from that, the shadow patterns on the face aren’t that different.
In contrast, thinner people have more edges on their faces.
It gets especially apparent in the cheek area:
Very thin people tend to have hollow cheeks – and those hollow cheeks are often in shadow (see the image above).
Also, the eyeballs tend to be more pronounced and have a little form shadow on them.
6. The Next Steps
By now you should have a good grasp of where the shadows are on a face.
But what are the next steps when learning how to shade a face?
You need to learn how to use midtones.
Areas that aren’t in shadow are bright – but depending on the angle towards the light, some areas aren’t as bright as others. That’s where halftones come into play.
Moreover, you must get to know the planes of the head that I mentioned at the beginning of the article. That definitely allows you a fuller understanding of every little shape and every part of the face.
I highly recommend these two videos of mine, where I discuss the Asaro Head. It’s a very useful tool for learning how to shade a face.
I hope you found this article helpful. If so, let me know in the comments!
Happy drawing!
this is really helpful
Thanks, Lucy! Glad I could help! 🙂
wow superb, very densely detailed yet short and to the point , realy learned a lot, totally game changer articile for me! thanku sir!
Thanks for the compliment! I’m glad you learned something! 🙂
Thank you, so clearly explained, I finally got it……
Nice! I’m glad I could help. 🙂
This is the most beneficial information I’ve ever read about face shadows. I can not thank you enough!
Very cool! I’m so glad you liked it. Thanks for the kind words! 🙂
Great explanations, brilliant visuals. Have saved them all for reference…thank you
You’re welcome, Iman! Thanks for the kind words. 🙂