Note: This post contains affiliate links. As a Skillshare Affiliate and Amazon Associate I get commissions for purchases/signups made through links in this post.
This is a complete beginner guide for rendering in digital painting.
You’ll learn everything about rendering: what it is, how to do it (step by step) and how to improve your rendering skills.
And there’ll be a lot of helpful tips and tricks along the way, so that you can avoid digital art beginner mistakes.
Let’s get started!
Table of Contents
What Is Rendering In Digital Art?

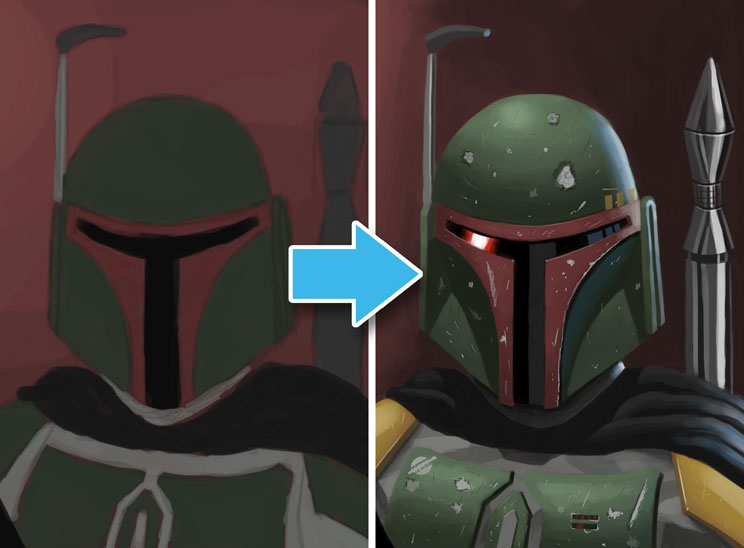
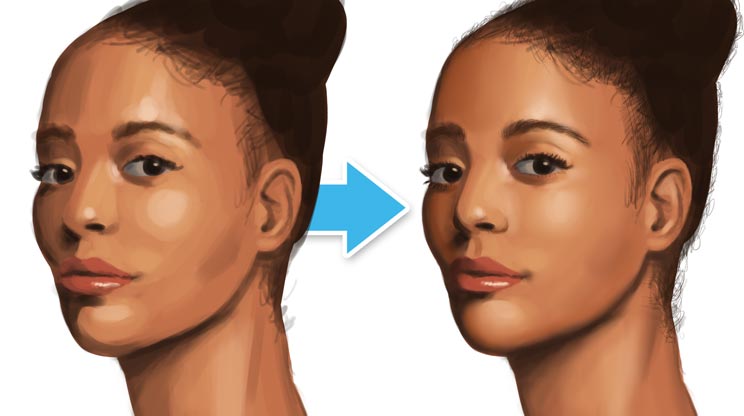
Rendering in digital art is the process of taking a painting from a rough state to a more polished finished state. Rendering is usually done in several distinct stages. It is mostly concerned with working on lighting/shading and adding details/textures.
A little history lesson:
Originally, the term rendering comes from 3D computer graphics. It’s used to describe the whole process of creating a digital scene with the help of a 3D modeling program.
3D objects are created and placed in an environment. Then they are processed with fancy techniques like vertex shading, texture-mapping, bump-mapping and whatnot – mostly with the goal to make it look real. The resulting image or video is called the render.
These techniques (and more) are all used to make video games look good, for example. The thing is this: all that they do is simulate reality.
In digital painting, the term rendering is commonly used, as well. Probably because it’s also made with a computer. Essentially, both are pretty much the same thing – just that one is calculated with a 3D program and one is painted by hand (but with a similar approach).
CHECK OUT: Must-have Art Equipment I Recommend
How To Render A Digital Painting – Step By Step
When painting a digital artwork, there are several distinct stages that most artists go through every time.
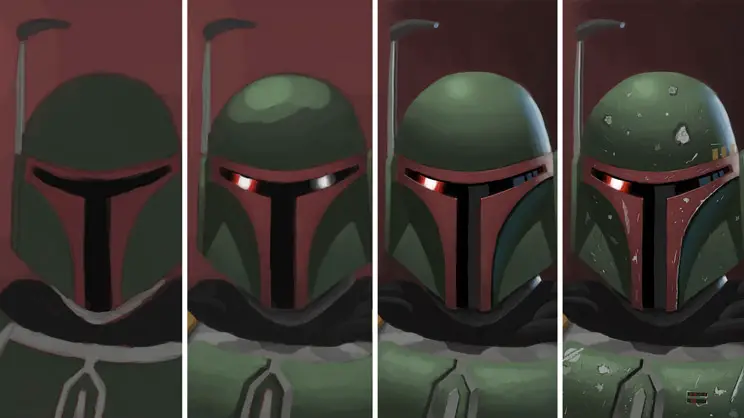
It all starts with a sketch. That sketch can then be worked on more thoroughly to get a cleaner preliminary drawing. Then flat colors are put down, light and shadow are added and colors get blended. Finally, you add details.
IMPORTANT: We will look at these stages in isolation and you can actually paint this way. It’s especially helpful for beginners because it helps them to focus on each step separately. As you get more advanced though, these stages will naturally become blurred and you might be painting several things at the same time.
For example, an experienced artist might omit a preliminary drawing and go straight to flat colors. Afterwards, he might add light and shadow and blend those colors immediately, while also adding some details in between.
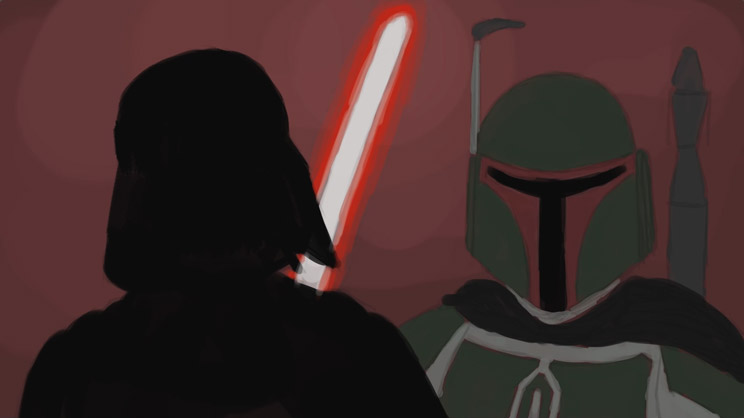
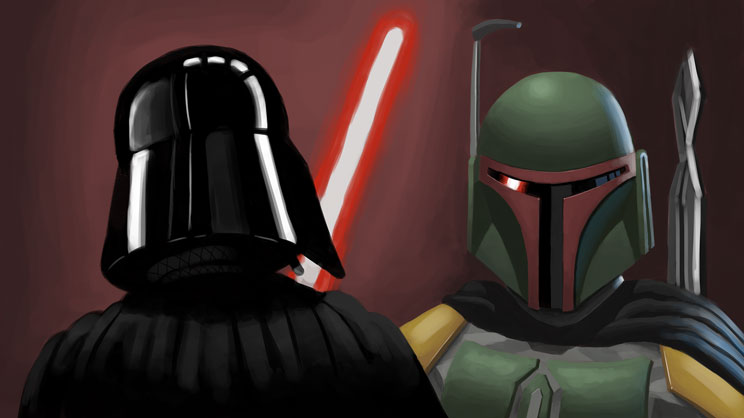
The following example is a painting of Boba Fett and Darth Vader I did.
I will try my best to make each step understandable.
You can watch the whole process here:
1. Sketch
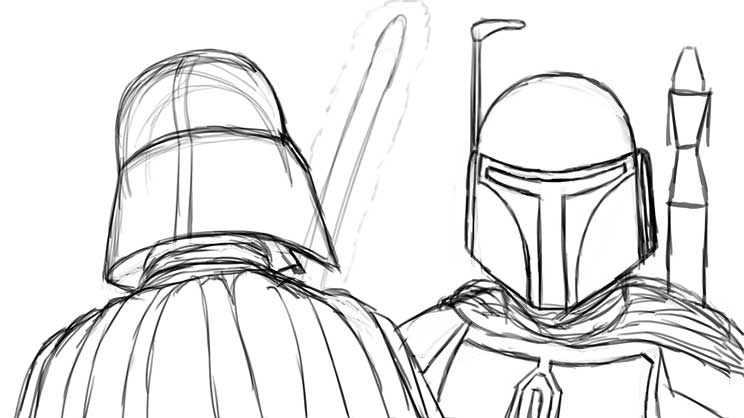
The sketch is the first rough scribble of the initial idea for your painting.
Here you try to simplify what’s in your head and just put something on the canvas. The goal is to get started! You establish your composition (the placement of all elements in your artwork) and work on the basic perspective and the poses of your characters.
The goal:
- put something on the canvas (get started)
- establish the composition (placement of elements)
What to do:
- scribble!
- establish basic perspective (horizon line & vanishing points)
- place all your characters/objects
- work on poses/proportions
TIPS:
- keep it loose
- don’t draw details
- don’t overthink this
- consider using a tablet with integrated screen (I use the XP-Pen Artist Pro 16TP (read my review here))
2. Preliminary Drawing
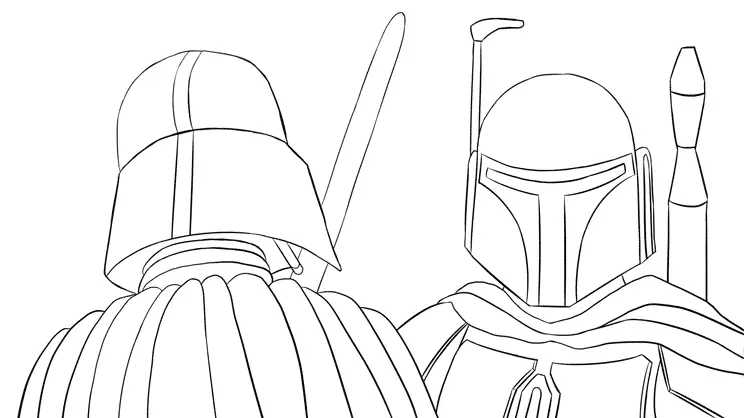
The preliminary drawing is a refined and cleaner version of your sketch.
This is an optional step that many artists skip. Whether you do this step or not, depends on your personal painting style – and also on what you want your final digital art piece to look like.
You should do this step if you are a beginner and lack experience. A preliminary drawing can help you get a cleaner result. The defined lines can act as a kind of roadmap for your painting.
You can skip this step if your skills are pretty advanced already and you don’t need the exact outlines to guide you while painting. Experienced artists often go from the sketch straight to flat colors (like I did in this Boba Fett painting, too).
Note: If you want to create digital comic art, you obviously need this step. It lives and dies by the quality of its line art.
The goal:
- create a clean base to put colors on
- create beautiful line art (for comic art)
What to do:
- create a clean version of your sketch
- vary line weight (optional – can make it look more appealing)
TIPS:
- redraw choppy/uneven lines (again and again)
- use CTRL + Z liberally (but don’t break the keyboard)
3. Flatting / Base Colors
“Flatting” is the process of laying down the base colors.
In this step, you paint the basic colors of your characters/objects without considering light and shadow or textures. For example, if the pants of your character are blue, you just paint a flat blue color inside the lines of that part of your drawing.
The goal:
- establish the basic color scheme of your painting
What to do:
- paint flat base colors of your characters/objects
TIPS:
- paint on a separate layer: This way you can change the colors without affecting your lines.
- set the upper layer to “multiply”: If you set the layer that’s above the other to the blending mode “multiply” (available in every painting software), the colors will show through.
4. Light And Shadow

Adding light and shadow is what makes your digital painting look more three-dimensional.
Note: This stage often happens in conjunction with the “blending” stage (see #5).
In this stage, you focus on shading your painting. The first step is to separate your flat colors into two areas – one “light” area and one “shadow” area.
This is the simplest way to approach shading in the beginning: either an area is hit by light (and therefore bright), or it’s in shadow (and therefore dark).
Shading like this is an art style in itself called cel shading.
This stage can really make or break your painting. It involves a lot of complicated things like midtones, reflections, reflected light and whatnot.
It’s too much to cover in this guide and requires separate tutorials. For starters, check out these two guides of mine:
- Drawing Shadows On Faces: The Complete Beginner Guide
- Midtones: An In-Depth Look At Mastering Halftones In Art
The goal:
- establish the basic lighting situation
What to do:
- divide everything into one “light” area and one “shadow” area
TIPS:
- paint on separate layers: You can paint light and shadow on separate layers, too. This way you can change the lighting situation without affecting your base colors. You can even paint these on two separate layers, one for light and one for shadows. Then you can change the colors of light and shadow individually – giving your whole painting a dramatically different look.
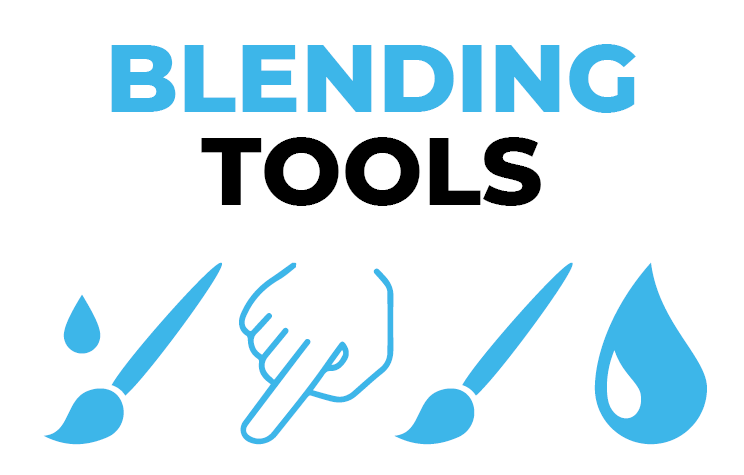
5. Blending Colors
Blending is the process of mixing neighboring colors in a way that creates a smooth transition between them.
Note: This stage often happens in conjunction with the “light and shadow” stage (see #4).
In nature, light rarely creates hard and flat shadow shapes. Instead, light and shadow often transition into each other softly. This is what you try to achieve with blending.
Some general rules for blending:
- paint hard shadows where there’s a hard edge
- paint soft transitions where there’s a rounded surface
- cast shadows usually produce hard edges
How do you blend colors effectively? Which tools should you use?
That’s a complex topic for another article. I’ll link it here as soon as it’s ready.
For now, check out my blending tips below:
The goal:
- create smooth transitions between colors (where appropriate)
What to do:
- blend the colors with your tool of choice (hard brush [manual blending], mixer brush, smudge tool, etc.)
TIPS:
- don’t make the transitions too smooth: It can make your painting look “fake”.
- use a textured brush: This can automatically create some interesting texture in your painting.
6. Adding Textures & Details

Adding textures and details is the final step in making your digital painting more believable and realistic – and interesting to look at.
By now, your digital painting should already look quite good and three-dimensional. But depending on the art style you’re after, it might just feel like something’s missing.
That’s when it’s time to add more details and textures. These make your whole painting more interesting because it offers the eye something to explore. And they can make your piece look more realistic, too.
The goal:
- make your painting look more realistic
- add something interesting to look at
What to do:
- add textures and details
TIPS:
- don’t draw too many details: This can ruin your painting because it’s overbearing for the eye to look at.
- increase details & textures in focus areas: Paint the most details in areas you want the viewer to focus on – you can guide the viewer’s eye.
Improve Faster With My FREE e-Book!
Learn how to MASTER drawing in 5 easy steps with my FREE PDF guide!
Discover a methodical way to learn drawing effectively!
How To Get Better At Rendering Digital Art
The above should have given you a solid overview of how a digital painting is made. Now you should know the goals of the different stages of a digital artwork and what they require of you as an artist.
But what if your digital art looks bad? What are some more tips to improve your rendering?
To get better at rendering you need to:
1. Learn About Shadow Edges
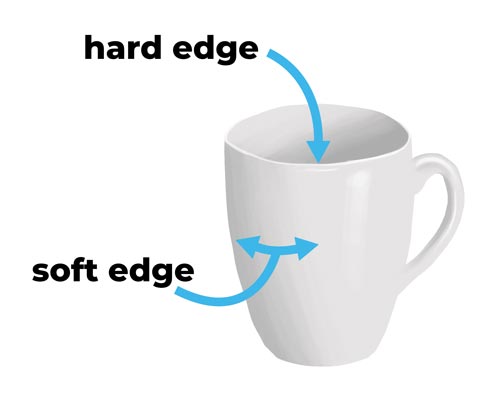
Edge control is really important when it comes to rendering believable paintings.
If you use edges wrong, your paintings can either look blurred and too soft (no edges at all) – or they can look like cartoons (just hard edges and no smooth transitions of colors anywhere).
That’s fine, if you want to paint cartoons. But assuming you want to paint something (semi-)realistic, you need to know when to paint hard or soft edges:
Paint hard edges:
- at the edge of objects (like the edge of a table, or the edge of a nose, etc.)
- cast shadows (shadows that objects throw on each other, usually they are hard-edged)
Paint soft edges:
- where an object has a rounded surface (and not a hard edge)
These are the basics and they can get you quite far.
This video demonstrates it perfectly:
2. Learn How To Blend Colors
Rendering digital art requires painting soft edges where needed (see #1). And to paint these soft edges (gradients) effectively, you need to know how to blend colors.
Blending means mixing two adjacent colors to create a smooth transition between them. It’s one of the essential skills of digital painting.
Once you’ve mastered it, you will probably find that you use it all the time during painting.
Luckily, it’s not that hard to learn:
2.1 Find The Right Blending Tool
The approach I recommend to beginners is to use a basic round brush and set the pen pressure to “opacity”. Thus you don’t rely on any fancy tools and can stick with the basics.
Check out what I mean in this video:
If you want to, you can also try some different tools/techniques like the smudge tool, the mixer brush, or something similar (depending on the painting software you use). Check out this video, too:
2.2 Do Some Blending Exercises
Once you’ve understood the fundamentals and the different tools you can use, you should do some basic blending exercises.
Start out by painting some simple value scales.
First, paint some boxes with hard edges:

Then, gradually blend the colors with different tools and techniques…

…until you end up with a smooth gradient like this:

If you feel like you’ve got the hang of it, you can try to apply what you’ve learned to basic forms like a sphere:
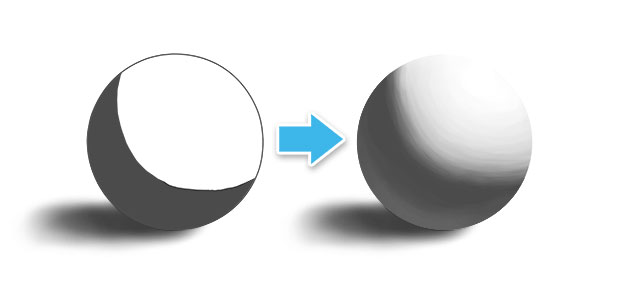
And once you’ve mastered the basic forms, you should theoretically be able to render anything.
3. Learn How To Paint Textures/Materials
Edge control and blending can already take you quite far. But without textures, your art will probably look sterile and fake. It will look like everything is made of just one material.
Digital painting tools offer a lot of ways to add texture to your artwork:
- put a photograph of a texture on a new layer and blend it with your painting
- use a custom brush to paint a texture onto your painting directly
However, I don’t recommend these to beginners. Instead, my advice is to paint textures by hand. See this passage of another article for the reason why.
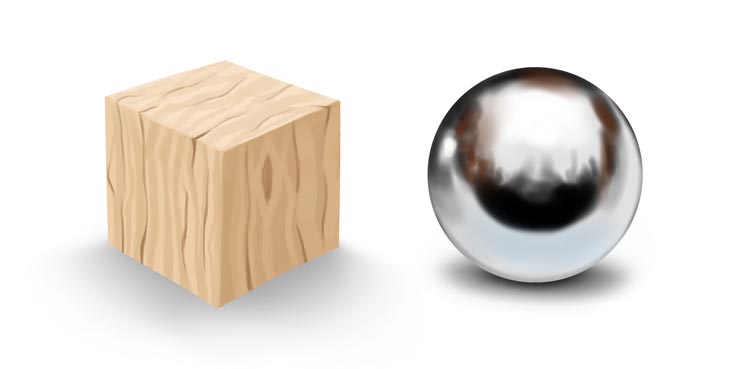
Textures go hand-in-hand with materials. Each object is made of a different material.
The material affects the degree of reflectivity of an object. Materials can range from little reflection (matte materials like stone) to some reflection (like plastic) to full reflection (like chrome).
The perfect way to practice drawing textures/materials is to draw several basic forms (like spheres or cubes) and transform them into a specific material:
4. Learn From The Pros
If all this information feels a little bit overwhelming to you, there’s always the possibility to learn from a professional.
Luckily, there are great online courses by veterans of the industry that can teach you the essentials quickly.
I recommend checking out the Skillshare class Digital Painting: From Sketch To Finished Product. Industry expert Hardy Fowler reveals the secrets of digital art. You’ll learn the basics fast and can watch (and copy) the creation of a digital painting that goes through all the rendering stages.
With my link, you can get a 30 day FREE trial of Skillshare. That means you can check out every other course for free, too. There are many more on digital painting.
Conclusion
I hope this little introductory guide could teach you something new. Feel free to share it on social media or use it as a resource.
Thanks for reading and see you next time!
READ NEXT:
9 Reasons Your Digital Art Looks So Bad [And How To Fix It]