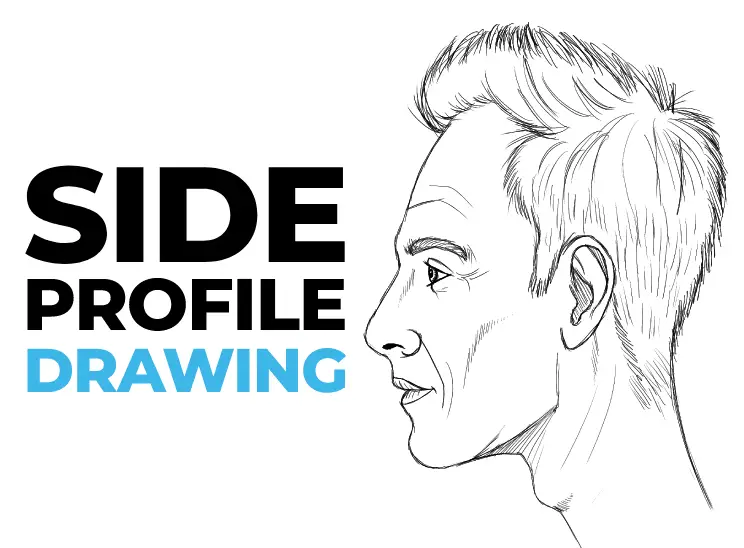
When learning to draw heads, one of the easiest things you can start out with is a side profile drawing.
At that angle, there’s no perspective involved, just like when you draw a face straight from the front.
It’s very schematic – and it all comes down to proportions (and a bit of anatomy).
This makes it perfect for beginners: If you can’t draw faces yet, it’s quick to learn and you can produce good results fast.
Let’s do just that right now!
CHECK OUT: The Best Methods To Draw A Head
Table of Contents
Drawing A Side Profile – Step By Step
A side profile drawing can be divided into simple steps. You start with a circle, divide it into parts, draw some guides, and off you go.
Here’s how it works:
1. Draw A Circle
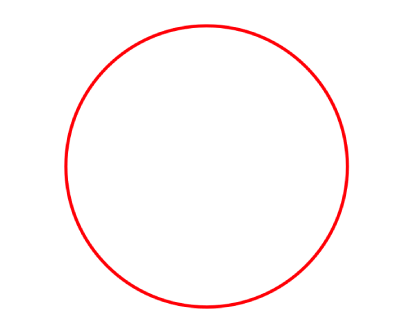
It all starts with a simple circle. Obviously, the head isn’t a ball, but this keeps things simple and acts as a base to build upon.
This is the first step and the easiest. Or is it? For many people, this is harder than it may seem. Who can draw a perfect circle anyway? I can’t, that’s for sure.
TIPS:
- Draw in a circular motion with light pressure. If your circle looks like an egg, adjust the motion on-the-fly until you get a better circle.
- Don’t hesitate to use a stencil or compasses. It’s okay!
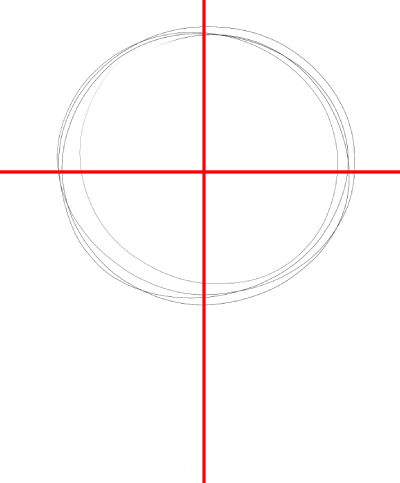
2. Divide The Circle Into 4 Equal Parts
Draw a straight line that divides the circle in half vertically. Then do the same, but horizontally. Simple.
3. Draw Basic Proportion Lines (Thirds)
The third step is a bit harder, but it’s one of the most important steps. In the end, these four lines will make or break your side profile drawing.
Get these wrong and your proportions will just not look right.
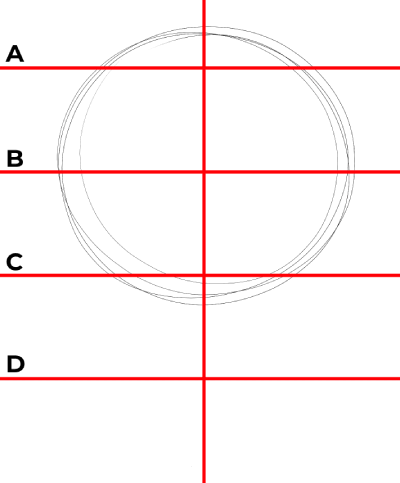
These lines divide the head into thirds – from the hairline to the bottom of the chin.
- Line B: Drawn in step 2.
- Line A: Draw it a bit higher than halfway between line B and the top of the head.
- Line C and D: Draw line C and line D, so that all lines have the same distance to each other.
CHECK OUT: Must-have Art Equipment I Recommend
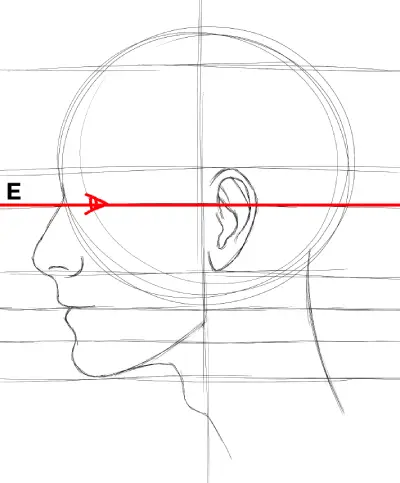
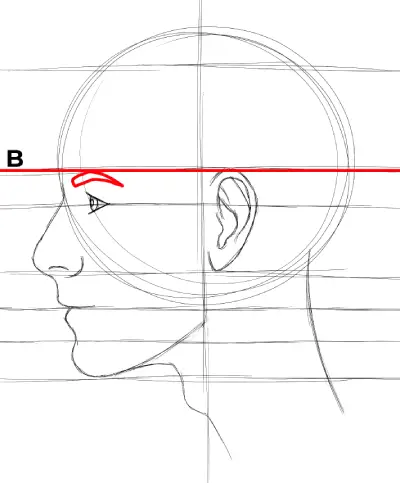
4. Draw The Eye Line
Next, let’s draw the eye line. This will be our final guide.
The eye line sits right at the center of the head, halfway between the top and bottom of the head:
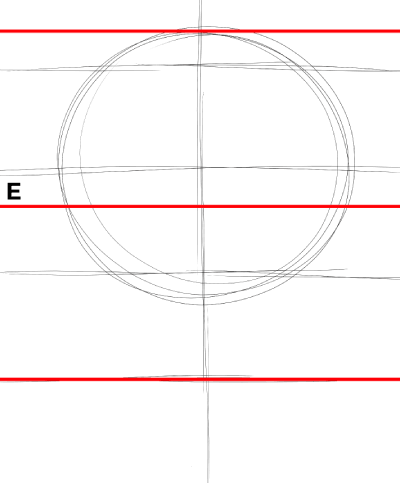
The eye line will be line E.
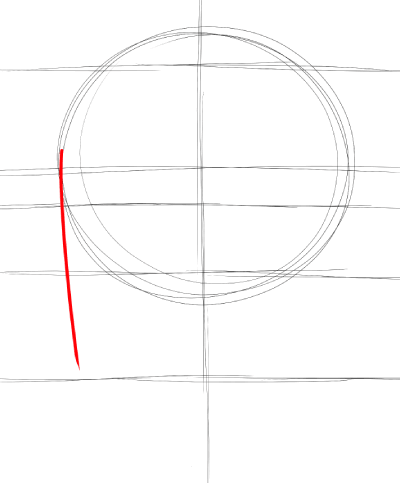
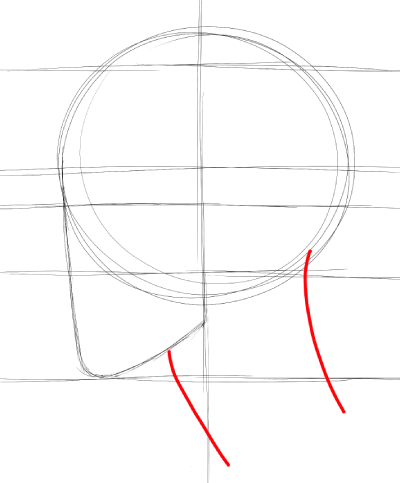
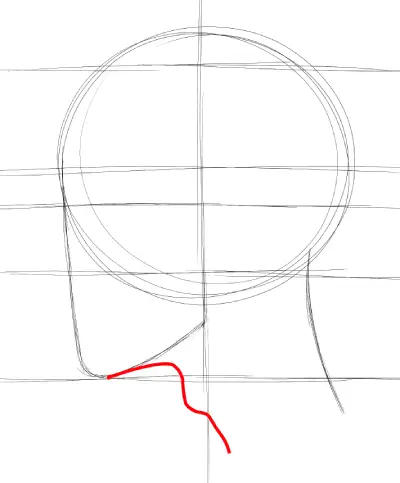
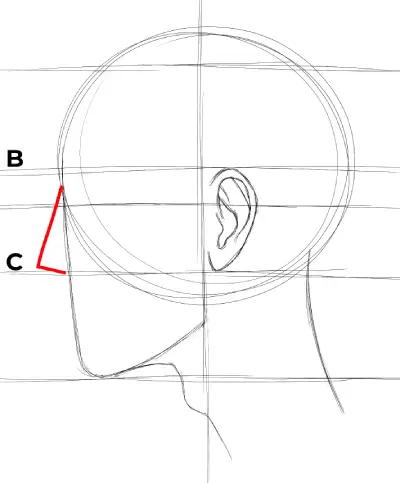
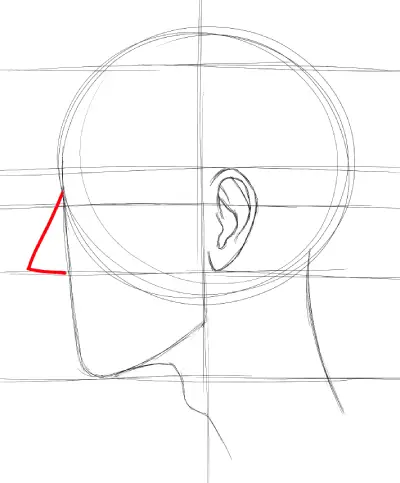
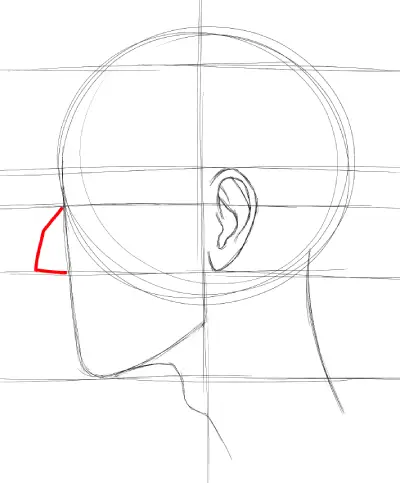
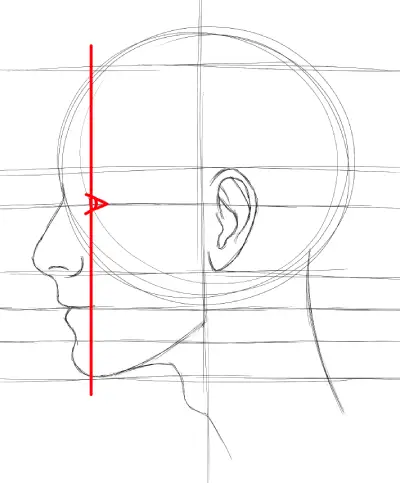
5. Draw The Jaw Shape
I prefer to draw the jaw shape next. This way, the drawing already starts resembling a head.
Note: This is not the final shape. It’s more like a basic shape to act as a base to build upon. The final shape will be heavily influenced by the nose, lips and chin.
First, draw a straight line at the edge of the circle:
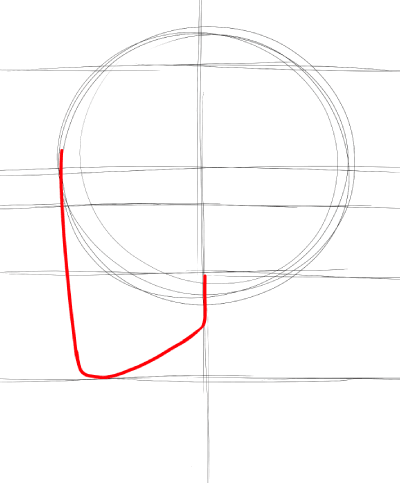
Second, draw the chin and the lower jaw line. To find the angle of the lower jaw line, you can draw a straight line from the chin so that it touches the edge of the circle:
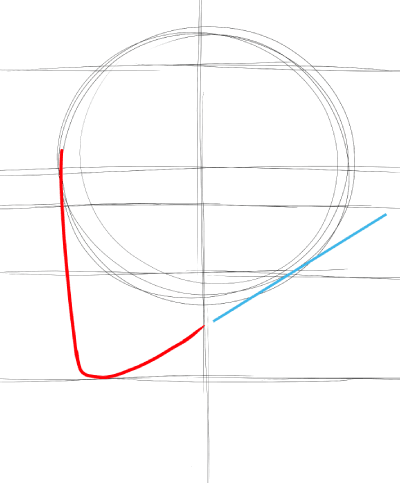
The jaw runs until the circle’s center line, where it connects vertically:
6. Draw The Neck
The neck is pretty easy to draw. Just draw two slightly curved lines – one at the back of the circle and one somewhere around the middle of the jaw:
TIPS:
- Don’t forget the skin/fat below the chin! This should be visible from the side, except for very thin people.
- Consider drawing a pronounced Adam’s bobble for men.
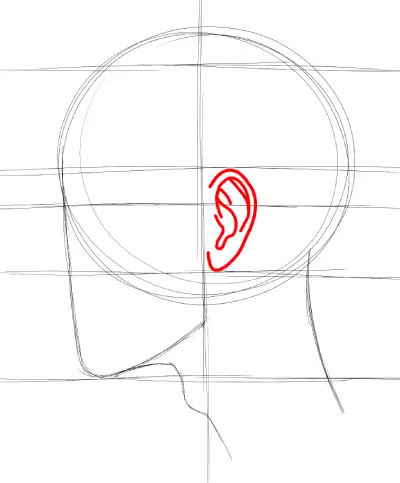
7. Draw The Ear
Draw an oval shape that represents the ear. The ear starts behind the jaw, right at the center line of the circle (or a little bit behind it, depending on the person). It sits right between line B and C.
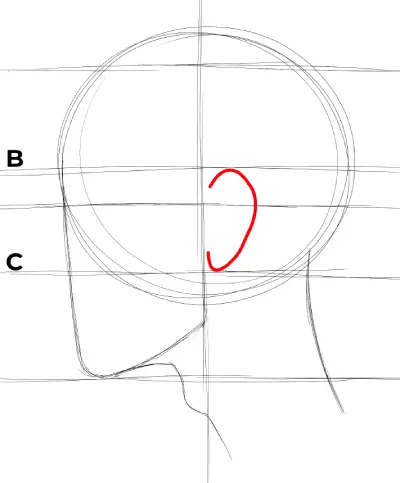
TIPS:
- There’s no secret to drawing the details of the ear. I recommend that you look at some ear drawings and just copy the lines.
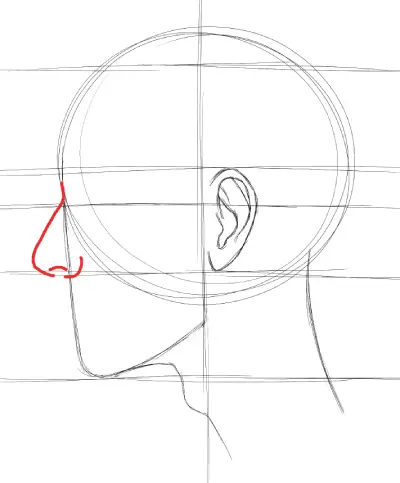
8. Draw The Nose
In this step, we’ll draw the nose. You can start with a basic triangle shape. The nose sits between Line B and C:
The angle of the nose can vary a bit – some noses are longer, some shorter:
Some noses have a very pronounced nasal bone:
Finally, round off the lines, draw the nostrils and the nasal hole:
9. Draw The Lips
The lips can be a bit tricky to draw if you don’t know the correct proportions. We haven’t drawn any guides for these yet …
… but luckily, there’s a way to make it much easier.
Can you guess it already? Yes, thirds, once again:
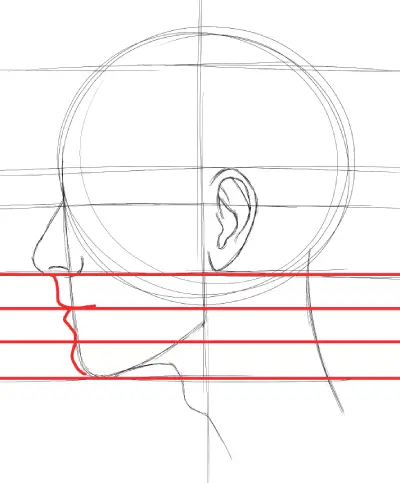
The lip line is right on the upper of the two lines you just drew.
There’s even a way to find the bottom of the lower lip: draw one more line between the new lines:
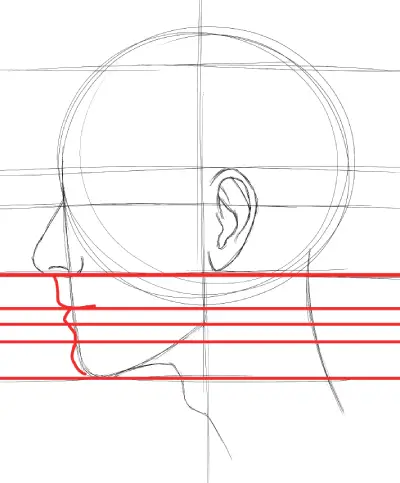
10. Draw The Eyes & Eyebrows
Finally, we come to the most important part of the face: the eyes.
We already drew the guide for the eyes in step 4, remember? It’s line E.
The eyes sit exactly on that line, in the middle of the head:
Horizontally, the eyes roughly start where the lips end:
The top of the eyebrows touches line B. The eyebrows run in a curved line above the eye:
TIPS:
- The eyes look like a triangle with one side being rounded
- The iris is an ellipse (instead of a circle, like in frontal view)
11. Refine The Shape Of The Head
As I said in the very first step, the head obviously isn’t shaped like a ball.
Now it’s time to refine the shape a bit more:
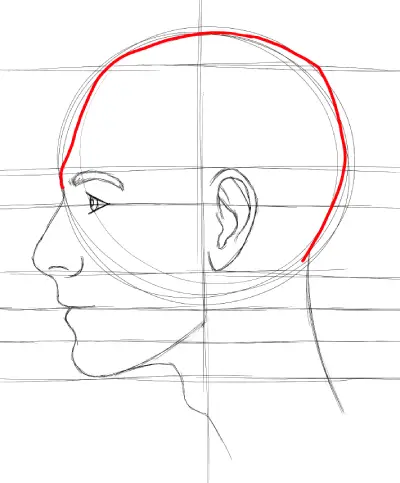
In general, the forehead is flatter and the whole head isn’t as round as a circle.
12. Draw The Hair
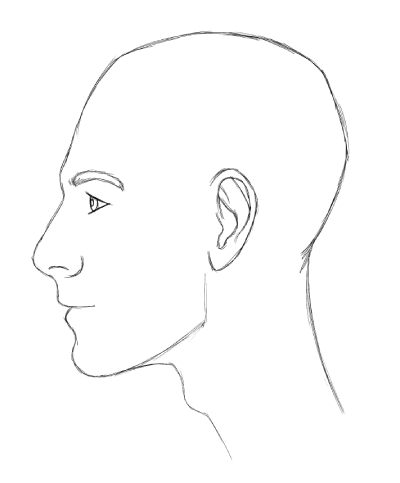
Our drawing could already pass as a bald person like me… but since the majority of people in this world have hair: Let’s add some!
You can be pretty creative here. Remember that line A is the hair line (drawn in step 3) – that’s where the bangs start.
Other than that, I recommend that you look at some images on google search for inspiration.
Here’s an example of how you could draw hair:
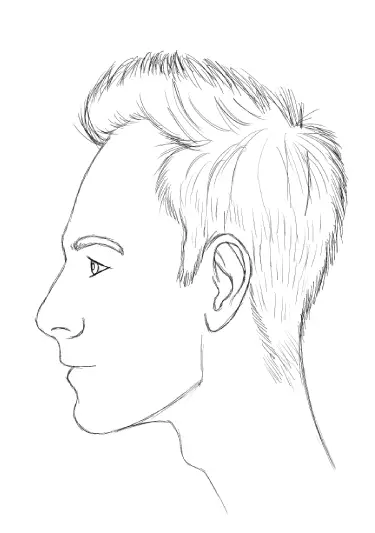
13. Add Details & Refine Your Drawing
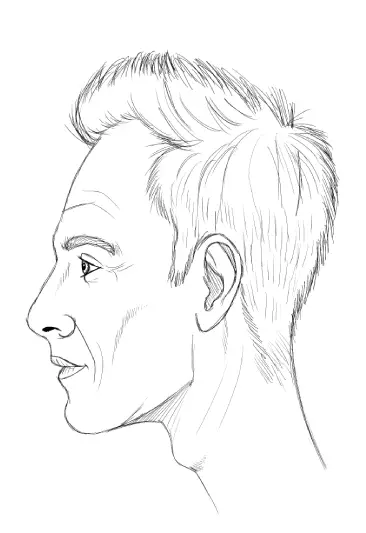
Depending on how many details you drew so far (and how detailed you want your drawing to look), you can now add some more.
What you can do is this:
- Refine the details in the ears
- Draw the contours of the lips and more details there
- Refine the nose shape
- Add details in the eyes and draw the eyelids
- Draw more detailed hair
- Add wrinkles to show age (check out my article on drawing wrinkles)
- Draw little shadows on the face with crosshatching
Improve Faster With My FREE e-Book!
Learn how to MASTER drawing in 5 easy steps with my FREE PDF guide!
Discover a methodical way to learn drawing effectively!
Video Demonstration
If you are stuck and need some more visual demonstration, check out master Stan Prokopenko casually drawing a great side profile:
Proportions In A Side Profile Drawing
A side profile drawing is viewed straight from the side – there’s no perspective involved.
This makes it easy for beginners because there’s one thing less to worry about. To make it look good, you especially need one thing: correct proportions.
Our drawing above checked most boxes when it comes to proportions. It just lacked an accurate way to measure the proportions horizontally, especially at the front of the face.
There are two methods for accurate proportions in a side profile drawing:
Method #1: Dividing Into Thirds Horizontally – Accurate, But Hard To Use
In my step by step guide at the beginning of this post, we divided the head into thirds vertically.
In this method, you divide it into thirds horizontally as well. The result is an intricate grid that can pretty much guarantee correct proportions.
From what I know, this method was first introduced by Andrew Loomis in Drawing The Head And Hands in 1956.
It looks like this:
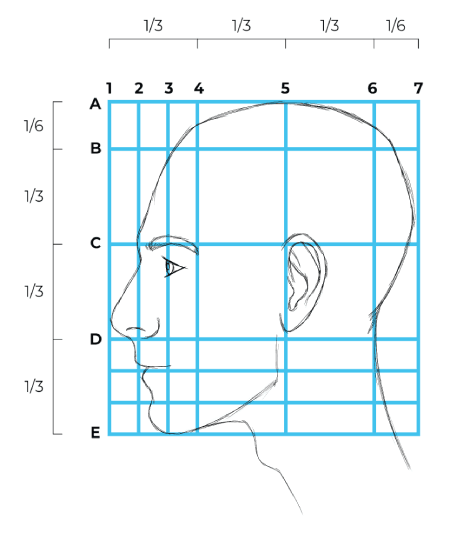
Seems complicated…?
This proportions grid works the following way:
- The head is 3 ½ units tall (top of head to chin)
- The head is 3 ½ units wide (tip of the nose to back of the head)
- The unit at the front of the head is divided into smaller thirds
- Line A is for the top of the head
- Line B is the hairline
- Line C is for the eyebrows
- The nose and the ear fit between lines C and D
- Line E is for the bottom of the chin
- Line 1 is for the tip of the nose
- Line 2 is for the front of the face (chin, lips & eyebrows)
- Line 3 runs through the eye and defines the end of the lips
- Line 4 shows the end of the eyebrows
- Line 5 is for the end of the jaw and the start of the ear
- Line 6 is for the end of the neck
- Line 7 defines the back of the head
About this method:
This method is very precise. The proportions of heads can vary quite a bit from person to person, but this comes close to being a perfect model. It almost leaves no room for error and makes it easy to create an accurate drawing.
That being said, I don’t find it very helpful.
Why? Well, who would want to draw such a “mathematical“ grid every time when drawing a head? I wouldn’t, that’s for sure. It doesn’t sound like fun to me.
Also, it’s not very practical. Dividing into thirds is one thing, but you can’t really do it intuitively because the head is three and a half units wide and high. Good luck measuring that by eye.
I prefer another method:
Method #2: Dividing Into Quarters – Less Accurate, But Easy To Use
Method #1 seems to be the standard way to get correct proportions in a side profile.
Since it’s hard to use, I developed another method: The Büsken-method.
Just kidding. It’s so simple that it doesn’t need a name. I just haven’t seen anyone use it like this.
It looks like this:
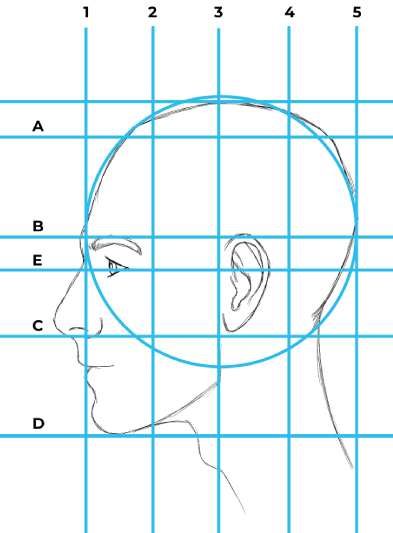
Here’s how it works:
Just take our drawing from step 4 and draw 4 more vertical lines, so that you get horizontal quarters.
Draw in the features like this:
- The ear: neatly fits in the rectangle made by lines B/C and lines 3/4
- The eye: sits on the eyeline, about halfway horizontally in the rectangle made by lines B/C and lines 1/2
The rest pretty much works itself out. For the nose, see step 8 and for the lips, step 9. I don’t think you need any more vertical lines to draw these – it shouldn’t be hard to draw them by eye.
Remember That Proportions Vary
Both method #1 and method #2 work well to establish believable proportions when drawing a head from the side.
But please remember proportions vary among people:
- sometimes the nose is longer or angled differently
- sometimes the lips sit a little bit lower on the face
- sometimes the ears sit further back on the head
- …
These little differences exist – and they’re what makes your portraits more human.
Just beware of too extreme proportions or your drawings will start to look like a caricature. Unless that’s what you want? Then go for it!
READ NEXT:
Why Can’t I Draw Faces? These Are The 5 Reasons Why!